Instructions for setting up an NTP server
(with AES-128-CMAC authentication support)
Follow these instructions to set up an NTP server in a Linux environment using the chrony package and using AES-CMAC 128 bits
as the hash algorithm for the authentication mechanism in client-server communication.
Chrony must be built from Source for AES CMAC support
To use chrony with support for AES-CMAC 128, version 4.0 or above has to be installed in your system. (As mentioned in
the release notes,
chrony 4.0 provided support for AES CMAC functions with Nettle dependency. Neither Ubuntu 18.04 nor
Ubuntu 20.04 provide a chrony package version with AES-CMAC support in their LTS releases.
Instructions
1. Install dependencies of chrony before building it from source
The list of dependencies can be viewed here: https://chrony.tuxfamily.org/doc/4.1/installation.html. Download all the dependencies.
sudo apt-get install libcap libseccomp pkg-config nettle-dev
nettle is the required package for enabling CMAC support in chrony. If nettle-dev does not
install the package headers files and its shared library, *.so files, then nettle will need to be
installed from source. Verify the installation of Nettle by looking for the presence of the nettle/cmac.h file,
and the hogweed.so and nettle.so library files, that are usually placed under the
/usr/ folder. If you cannot locate these files, install Nettle from source as explained in the next step.
Otherwise, skip to step 3.
For AL2 EC2 instances,
sudo yum install libcap libseccomp pkg-config nettle-dev
pkg-config and nettle-dev might not be found. Go to step 2.
2. (Optional) Install Nettle from Source
The build and install instructions for Nettle are here: https://www.linuxfromscratch.org/blfs/view/svn/postlfs/nettle.html. Follow
these instructions to install the package.
2.1 Download source and unzip
wget https://ftp.gnu.org/gnu/nettle/nettle-3.7.2.tar.gz

tar -xvf tar -xvf nettle-3.7.2.tar.gz
2.2 Build and install from source
./configure --prefix=/usr --disable-static && make -j8

sudo make install

sudo chmod -v 755 /usr/lib/lib{hogweed,nettle}.so
Verify the installation of Nettle by looking for the cmac.h file in the /usr/include/nettle directory
and the libogweed.so and libnettle.so libraries in the /usr/lib directory. It is
okay if libhogweed.so cannot be found.
3. Build chrony from source
As mentioned earlier, chrony >= 4.0 is required for AES-CMAC authentication support (with Nettle). Thus, here are
the instructions for building and installing it from source.
3.1 Clone the respository and checkout the latest release tag
Replace 4.1 with the latest release tag in the example here:
git clone https://git.tuxfamily.org/chrony/chrony.git

git checkout tags/4.1
3.2 Configure the build with system information of Nettle installation (and desired chrony.conf location)
The ./configure --help command can be used to view the usage documentation of the configure
script.
For my environment, I had to specify the folder path for the Nettle package's include and shared library files by setting
the CPPFLAGS and LDFLAGS environment variables. Also, I specified the location of the
chrony.conf and chrony.keys files by passing the ---sysconfdir=<DIR>
parameter.
In addition, I configured the installation to be in the /usr/sbin/ and usr/bin directories, with
the --prefix=/usr parameter, so that the built chrony binaries would be automatically picked up by my
environment PATH.
export CPPFlAGS='-I/usr/include'

export LDFLAGS='-L/usr/lib'

./configure --prefix=/usr --sysconfdir=/etc/chrony
Ensure that the build configuration logs show that nettle has been detected along with CMAC support in
your system and the SECHASH feature has been enabled for the chrony build. (The
SECHASH feature represents the support for the various hash/cipher algorithms used for the
authentication mechanism.)
This is how the tail end of the logs should look:
Checking for nettle : Yes

Checking for CMAC in nettle : Yes

Checking for gnutls : No

Features : +CMDMON +NTP +REFCLOCK +RTC -PRIVDROP -SCFILTER -SIGND +ASYNCDNS -NTS -READLINE +SECHASH +IPV6 -DEBUG

Creating Makefile

Creating doc/Makefile

Creating test/unit/Makefile
3.3 Build and Install chrony!
Build and install the chrony package in your system.
make -j 8

sudo make install
The above instructions will install chronyc and chronyd binaries in your system.
(chronyd is the actual daemon that performs NTP client/server operations whereas chronyc
is the user-facing client utility to query the status of the daemon.)
You will see something like the following installation log. Note: Errors about documentation output
installation can be ignored as the required dependencies of chrony for documentation were not installed.
╰─>  sudo make install

[ -d /etc/chrony ] || mkdir -p /etc/chrony

[ -d /usr/sbin ] || mkdir -p /usr/sbin

[ -d /usr/bin ] || mkdir -p /usr/bin

[ -d /var/lib/chrony ] || mkdir -p /var/lib/chrony

if [ -f /usr/sbin/chronyd ]; then rm -f /usr/sbin/chronyd ; fi

if [ -f /usr/bin/chronyc ]; then rm -f /usr/bin/chronyc ; fi

cp chronyd /usr/sbin/chronyd

chmod 755 /usr/sbin/chronyd

cp chronyc /usr/bin/chronyc

chmod 755 /usr/bin/chronyc

make -C doc install

make[1]: Entering directory '/home/ubuntu/Experiments/chrony/doc'

asciidoctor  -b manpage -o chrony.conf.man.in chrony.conf.adoc

make[1]: asciidoctor: Command not found

Makefile:44: recipe for target 'chrony.conf.man.in' failed

make[1]: *** [chrony.conf.man.in] Error 127

make[1]: Leaving directory '/home/ubuntu/Experiments/chrony/doc'

Makefile:88: recipe for target 'install' failed

make: *** [install] Error 2
3.4 Verify the installation
Verify that the chronyc and chronyd files have been installed in the system.
╰─>  chronyc --version                                                                                                                                                                                                                                                                                                                    130 ↵

chronyc (chrony) version DEVELOPMENT (-READLINE +SECHASH +IPV6 -DEBUG)
Also, verify with the keygen command of chronyc that the built chrony package supports AES-CMAC.
Here's an example run of the command showing support for AES-CMAC.
╰─>  chronyc keygen 1 AES128 128

1 AES128 HEX:6CD5CA79D68B815093BA1DEC9DBD691C
4. Configure reference NTP servers for chrony (before configuring it as a server)
Before you run chrony as a server, it must be configured as a client to source time from different reference
servers.
4.1 Setup the chrony.conf file
The chrony.conf file is used to configure the chrony daemon. The following configuration can
be placed in the /etc/chrony/chrony.conf file where both NTP Pool servers and the Amazon Time Sync service
(with the address 169.254.169.123) have been configured to source time from for the chrony client.
# Welcome to the chrony configuration file. See chrony.conf(5) for more

# information about usuable directives.


pool ntp.ubuntu.com        iburst maxsources 4

pool 0.ubuntu.pool.ntp.org iburst maxsources 1

pool 1.ubuntu.pool.ntp.org iburst maxsources 1

pool 2.ubuntu.pool.ntp.org iburst maxsources 2

server 169.254.169.123 prefer iburst minpoll 4 maxpoll 4


# This directive specify the location of the file containing ID/key pairs for

# NTP authentication.

keyfile /etc/chrony/chrony.keys


# This directive specify the file into which chronyd will store the rate

# information.

driftfile /var/lib/chrony/chrony.drift


# Uncomment the following line to turn logging on.

log tracking measurements statistics


# Log files location.

logdir /var/log/chrony


# Stop bad estimates upsetting machine clock.

maxupdateskew 100.0


# This directive enables kernel synchronisation (every 11 minutes) of the

# real-time clock. Note that it can’t be used along with the 'rtcfile' directive.

rtcsync


# Step the system clock instead of slewing it if the adjustment is larger than

# one second, but only in the first three clock updates.

makestep 1 3
4.2 Create chronyd.service file
The chronyd.service file specifies that chronyd is run as a daemon process. Place this file
with the following contents at /etc/systemd/system/:
╰─>  sudo cat /etc/systemd/system/chronyd.service

[Unit]

Description=chrony, an NTP client/server

Documentation=man:chronyd(8) man:chronyc(1) man:chrony.conf(5)

Conflicts=systemd-timesyncd.service openntpd.service

After=network.target


[Service]

Type=forking

PIDFile=/run/chrony/chronyd.pid

EnvironmentFile=-/etc/default/chrony

ExecStart=/usr/sbin/chronyd $OPTIONS

PrivateTmp=yes

ProtectHome=yes

ProtectSystem=full


[Install]

Alias=chronyd.service

WantedBy=multi-user.target
4.3 Run chronyd as an NTP client and verify
Start the chronyd service and verify the functioning of the NTP client with the chronyc utility
using its sources and tracking subcommands.
sudo service chronyd start
╰─>  chronyc sources

MS Name/IP address         Stratum Poll Reach LastRx Last sample

===============================================================================

^- alphyn.canonical.com          2  10   377   29m  -2864us[-2829us] +/-  105ms

^- chilipepper.canonical.com     2  10   377   22m  +2987us[+2988us] +/-  102ms

^- pugot.canonical.com           2  10   377    92  -1572us[-1571us] +/-  100ms

^- golem.canonical.com           2  10   377   479   -505us[ -509us] +/-  109ms

^- time.cloudflare.com           3  10   377   25m  +9676us[+9687us] +/-   22ms

^- a.chl.la                      2  10   377   486  +1995us[+1991us] +/-   87ms

^- ns4.asda.gr                   2  10   377   469  +7679us[+7674us] +/-  160ms

^- 0.cl.ntp.edgeuno.com          3  10   377   990  -5310us[-5326us] +/-  228ms

^* 169.254.169.123               3   4   377     2   +157ns[ +552ns] +/-  535us
╰─>  chronyc tracking

Reference ID    : A9FEA97B (169.254.169.123)

Stratum         : 4

Ref time (UTC)  : Wed Jun 09 23:41:53 2021

System time     : 0.000000990 seconds fast of NTP time

Last offset     : +0.000000155 seconds

RMS offset      : 0.000001250 seconds

Frequency       : 2.439 ppm slow

Residual freq   : +0.000 ppm

Skew            : 0.023 ppm

Root delay      : 0.000512199 seconds

Root dispersion : 0.000275599 seconds

Update interval : 16.2 seconds

Leap status     : Normal
5. Configure chrony as an NTP server
First, make sure that chronyd is running on your system as an NTP client by looking at the instructions in
Step 4.2.
5.1 Update chrony.conf with allow directive
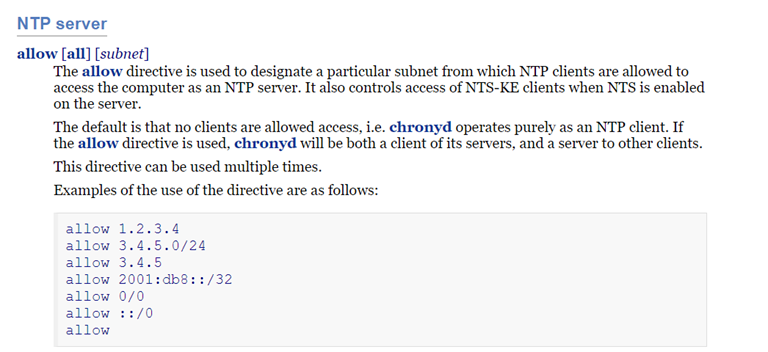
Once chronyd is working as an NTP client, it can be upgraded to an NTP server by adding the allow
directive to the chrony.conf file. The allow directive allows specifying the network and subnet
to accept NTP requests from. Refer to https://chrony.tuxfamily.org/doc/devel/chrony.conf.html for more information.

Click to enlarge
echo 'allow 0/0' >> /etc/chrony/chrony.conf
5.2 Rerun chronyd in NTP server configuration
Re-run chronyd with the updated configuration to enable the NTP server feature.
sudo service chronyd restart
Again, verify that chronyd is running with the chronyc tracking or chronyc sources command.
5.3 Sanity check server mode of chronyd with a Python script
Use the following python script to verify the NTP server mode of chronyd is running locally.
#!/usr/bin/env python

#

# Requirements: ntplib (easy_install ntplib)

import ntplib

from time import ctime

import argparse


parser = argparse.ArgumentParser( description="test-ntp.py - Test a set of IP addresses for NTP " )

parser.add_argument("--ip", action="append", help="IP address to check for NTP")

a = parser.parse_args()

if a.ip is not None:

    c = ntplib.NTPClient()

    for ip in a.ip:

        try:

            response = c.request(ip)

            if response:

                print (ip+" NTP Active "+ ctime(response.tx_time))

        except:

            print (ip+" NTP Deactivated")

else:

    parser.print_help()

    exit(1)
Invoke the script as python3 <script-name>.py --ip localhost. Here is an example output showing the
successful configuration of chronyd as an NTP server.
╰─>  python3 ~/Experiments/test-ntp-server.py --ip localhost

localhost NTP Active Wed Jun  9 23:59:41 2021
6. Enable symmetric key based authentication in the NTP server
You can enable symmetric key based authentication for communication with the NTP server by adding keys to the
/etc/chrony/chrony.keys file. Keys can be generated by using the keygen subcommand of
the chronyc utility.
6.1 Generate AES-128-CMAC key for authentication and configure it in NTP server
The key generated by the chronyc keygen command can be added to the chrony.keys file.
chronyc keygen 1 AES128 128 > /etc/chrony/chrony.keys
Multiple keys can be added to the chrony.keys file where each key is referenced by the Key ID. In the above
command, 1 is the Key ID for the AES-128-CMACM key.
Verify that the key has been added to the chrony.keys file with sudo cat /etc/chrony/chrony.keys.
6.2 Rerun NTP server to use the authentication keys
Once the NTP server is re-run, it will service both:
- Clients that have authentication code (MAC), generated with the key known to the server, in their request payload, AND
- Clients that do not communicate in authentication mode, i.e. they do not have MAC in their request payload.
sudo service chronyd restart
Copyright (C) Amazon Web Services, Inc. or its affiliates. All rights reserved.